After a lot of reflection, I traded the VTR about a month ago. For the most part, it was fun to ride but I could never quite get comfortable with the riding position. I learned to ride on a 1986 Honda Reflex (TLR200) which is the 'street' version of Honda's competition trials bike from the early 80s. After a series of dual sport bikes, the VTR was my first street (only) bike. While the riding position was closer to standard than sport, it never really felt comfortable. So, it went to new owners that will appreciate it it for what it is. I now have a 2004 Honda Reflex (scooter) that will be used for commuting. My wife has an '02 Reflex so I am very familiar with the vehicle. Considering it has only 4400 miles, it's barely broken in.
I will leave the blog up to be used as a resource. However, it may behoove you to navigate to the shop manual chapters and save individual copies for your use. You never know when I'll lose my ability to host PDF files.
Tuesday, July 30, 2013
Wednesday, May 8, 2013
Mind your gasket sealers & RTV
I recently had my carburetors overhauled due to failing o-rings on the fuel supply line. The person that did the work used a Permatex product called Super 300 Form-A-Gasket Sealant. What he did not know was that these products have a shelf life. How long? We'll get to that momentarily.
A little history; in the late 80s and early 90s, I raced a 1967 Austin-Healey Sprite Mk IV (same as an MG Midget Mk III) in Sports Car Club of America's F Production class. We used Super 300 to seal head gaskets. So, I was familiar with the product, albeit in a different application.
When the carburetors were returned to me, I was a little surprised to discover a greenish-brown sealant on both the float bowl o-rings as well as the slide diaphragms. I queried the re-builder and learned that the sealant was indeed, Super 300. OK, fine. I was a little surprised that the float bowl o-rings needed this because not only were they brand new, they also sat nicely in their recesses in the float bowls. There was really no reason to 'glue' them in place.
I re-assembled everything and started the engine. It idled pretty nicely. I took it for a short ride to get it up to temperature, and then tried to accelerate up to the speed limit. At 5000 rpm, the engine stopped pulling and pretty much "fell on its face". Not good. I checked to see if I had an electrical issue (only one cylinder working). Nope, both exhaust pipes were hot. Then, I wondered if the petcock was some how restricting fuel flow. Nope, after removing the petcock from the equation, the engine still ran poorly. At this point, the only thing left was to remove the carburetors and inspect them. After popping off one of the float bowls, this is what I saw:
The Super 300 had clearly come in contact with the gasoline and dissolved into it. Needless to say, I gave both carburetors a good cleaning. It took a small piece of Scotch-Brite, soaked in carburetor cleaner, to get the o-ring sealing surfaces clean. Other places required a toothbrush to remove that residue. The obvious conclusion was that Super 300 is not compatible with gasoline. Not so fast my friend.
I had to understand what was going on here. So, I called Permatex and spoke with a tech. He told me that Super 300 was compatible with gas. Huh? So, why did this occur? It would seem that Super 300, like other Permatex products, has a shelf life. And, the shelf life of Super 300 is two (2) years. I contacted the re-builder and discovered that his container of Super 300 was somewhere around twenty (20) years in age. !!! So, boys and girls, don't assume that your sealants are still good after they've been sitting in your toolbox or on your garage shelf for years and years and years. Most likely, they're not.
As a follow-up, the Permatex tech suggested I use a newer product; PermaShield. Not only does this product have the same capabilities as Super 300, it supposedly will handle dis-assembly and subsequent re-assembly without requiring another application. That's pretty nice. The shelf life of PermaShield is also two (2) years but Permatex is thinking of extending that. I also found that Super 300 isn't as readily available as it was when I was racing. Every auto parts store I visited indicated it was "special order". PermaShield is supposedly stocked by all of the major auto parts store chains with the possible exception of NAPA (why, I do not know).
So, got a container of Super 300 on the shelf? Don't have any idea how old it is? I would suggest you discard it and go get something fresh. Even if it's another container of (now special order) Super 300, at least you know it'll do what you expect it to do (especially if fuel is involved). Perhaps writing a date on the container isn't a bad idea either.
After the cleaning, the carburetors work as they should and the engine pulls all the way past 10,000 rpm. Nice.
A little history; in the late 80s and early 90s, I raced a 1967 Austin-Healey Sprite Mk IV (same as an MG Midget Mk III) in Sports Car Club of America's F Production class. We used Super 300 to seal head gaskets. So, I was familiar with the product, albeit in a different application.
When the carburetors were returned to me, I was a little surprised to discover a greenish-brown sealant on both the float bowl o-rings as well as the slide diaphragms. I queried the re-builder and learned that the sealant was indeed, Super 300. OK, fine. I was a little surprised that the float bowl o-rings needed this because not only were they brand new, they also sat nicely in their recesses in the float bowls. There was really no reason to 'glue' them in place.
I re-assembled everything and started the engine. It idled pretty nicely. I took it for a short ride to get it up to temperature, and then tried to accelerate up to the speed limit. At 5000 rpm, the engine stopped pulling and pretty much "fell on its face". Not good. I checked to see if I had an electrical issue (only one cylinder working). Nope, both exhaust pipes were hot. Then, I wondered if the petcock was some how restricting fuel flow. Nope, after removing the petcock from the equation, the engine still ran poorly. At this point, the only thing left was to remove the carburetors and inspect them. After popping off one of the float bowls, this is what I saw:
 |
| Ick |
 |
| More Ick |
The Super 300 had clearly come in contact with the gasoline and dissolved into it. Needless to say, I gave both carburetors a good cleaning. It took a small piece of Scotch-Brite, soaked in carburetor cleaner, to get the o-ring sealing surfaces clean. Other places required a toothbrush to remove that residue. The obvious conclusion was that Super 300 is not compatible with gasoline. Not so fast my friend.
I had to understand what was going on here. So, I called Permatex and spoke with a tech. He told me that Super 300 was compatible with gas. Huh? So, why did this occur? It would seem that Super 300, like other Permatex products, has a shelf life. And, the shelf life of Super 300 is two (2) years. I contacted the re-builder and discovered that his container of Super 300 was somewhere around twenty (20) years in age. !!! So, boys and girls, don't assume that your sealants are still good after they've been sitting in your toolbox or on your garage shelf for years and years and years. Most likely, they're not.
As a follow-up, the Permatex tech suggested I use a newer product; PermaShield. Not only does this product have the same capabilities as Super 300, it supposedly will handle dis-assembly and subsequent re-assembly without requiring another application. That's pretty nice. The shelf life of PermaShield is also two (2) years but Permatex is thinking of extending that. I also found that Super 300 isn't as readily available as it was when I was racing. Every auto parts store I visited indicated it was "special order". PermaShield is supposedly stocked by all of the major auto parts store chains with the possible exception of NAPA (why, I do not know).
So, got a container of Super 300 on the shelf? Don't have any idea how old it is? I would suggest you discard it and go get something fresh. Even if it's another container of (now special order) Super 300, at least you know it'll do what you expect it to do (especially if fuel is involved). Perhaps writing a date on the container isn't a bad idea either.
After the cleaning, the carburetors work as they should and the engine pulls all the way past 10,000 rpm. Nice.
Tuesday, January 8, 2013
Replacing Carburetor Boots
At some point in the life of your VTR, the carburetors are going to need maintenance. Removing them can be a frustrating experience because you're going to have to deal with 20+ year old rubber; the boots that connect the carburetors to the cylinder heads. Honda provides very good parts support for their older motorcycles. Most maintenance parts are still readily available, from various sources. I had no issue finding boots. The dis-assembly process will also provide excellent access to a couple of other maintenance items; spark plugs and air filter. If these haven't been addressed recently, now may be a good time as any. As with the boots, the plugs and filter are readily available. Lastly, you will have excellent access to the petcock vacuum hose. It's cheap and easy to replace. With all of this maintenance 'on the brain' you may be tempted to replace the fuel line, too. In this case you may want to leave it alone unless it's really shot and/or leaking. The "T" in the line is fragile and requires o-rings to properly seal. The o-rings aren't so readily available nor is the "T". Considering the age of these bikes, you may want to add an in-line fuel filter, in between the petcock and the "T", which will catch any debris that makes is past the screen inside the petcock.
Start by removing the bodywork so that you can access the fuel tank. Here's a LINK to Chapter 12 of the Shop Manual, which outlines the bodywork removal. You will need to remove the Side Covers and the Side Fairings only.
When that step is complete, you'll need to follow procedures in Chapter 4 of the Shop Manual (LINK). Start on page 4-3.
Images are thumbnails, click for larger version.
Here, I have removed the bodywork and the fuel tank:

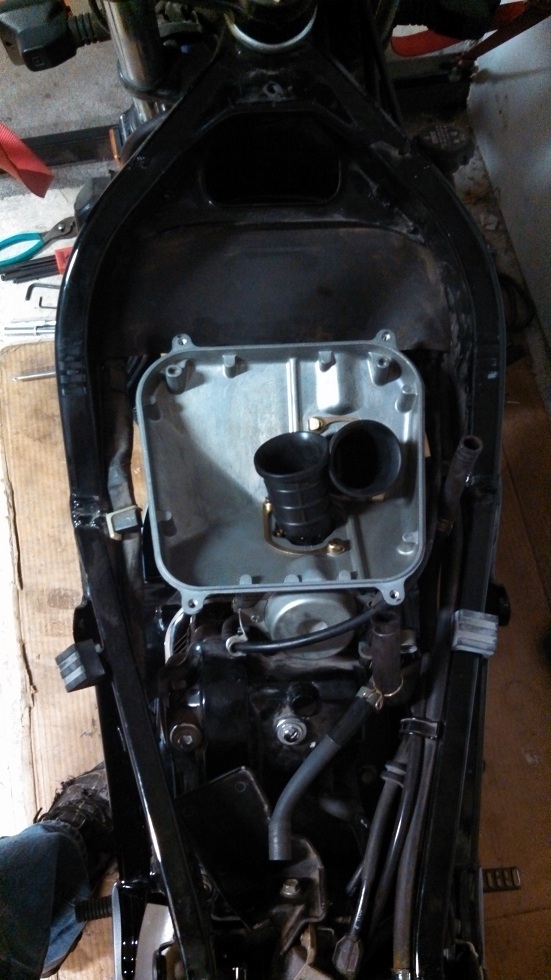
Disconnect the fuel overflow tube from the side of the air box. There are six Phillips head screws holding the air box cover. Remove them, remove the cover and the air filter. You may have to wiggle the cover, from side-to-side, as the snorkel is tucked into the frame near the head bearings.

There is a domed screen over the carburetor trumpets. Around the perimeter of that screen are four Phillips head screws. Remove them so that the bottom of the air box can be removed. Also, be sure to remove the breather tube from the right rear corner of the air box base.

It's now time to remove the carburetors (along with the cast aluminum plenum), as an assembly. To do so, loosen the four carburetor boot retaining clamps. The Shop Manual shows the clamps to be oriented so that access is from the right side of the bike. This means you'll have to peer through coolant hoses to locate the screw heads.
With the clamps loose, grasp the aluminum plenum and wiggle it backward/forward and side-to-side to break the carburetor assembly loose from the boots and/or cylinder heads. If the boots have hardened, you may need to cut them, from top to bottom, with a razor blade (utility knife). Try to be patient here, sometimes counter-intuitive movements will achieve the desired results.

Now that the carburetor assembly is free of the boots/motor, you will need to disconnect the choke cables as well as remove the accelerator cables.
For the choke cables, use a 14mm open end wrench to loosen the choke valve nut. Take care here as the nuts are plastic and can easily strip. Once they are loose, you can remove them using your fingers. There is a rubber boot that covers a portion of the nut and part of the cable. The boot will be tight (no air leaks!) and thus cause the nut to turn slowly. Be patient, turn the nut and wait for the boot to "catch up", then turn the nut some more. When the rear choke cable is free, drape it over the right side of the frame, this will help keep it out of your way while you work on the valve nut on the front carburetor.

For the throttle cables, use a 10mm wrench to loosen the lock nuts. The lock nuts are the nuts closest to the throttle drum (where the cable ends attach). You may need to use another 10mm wrench to keep the adjuster nuts from turning. Spin the lock nuts all the way to the end of the exposed threads (but not off). You should now have plenty of room to free the cables from the cable holder. Rotate the throttle drum, clockwise, which will expose the lower cable end. Remove the lower cable end from the drum. Release the drum and remove the upper cable end from the drum. The carburetor assembly should now be free and can be set aside (for whatever maintenance is required).

You may want to use a small piece of rag or paper towel to block the intake ports. You certainly do not want any dirt/debris (or parts!) to fall into that opening. If one, or both, of the boots remain on the cylinder head(s), remove it/them. Take this opportunity to clean around the cylinder head openings (and the upper engine in general). If you're changing spark plugs, you now have excellent access to the rear cylinder head.
I chose to attach the boots to the carburetor assembly and then put the entire assembly back on the motor (after I finished working on the carburetors). I did it in this manner because I wanted to ensure that I had the boot oriented correctly. There is a "carb side" (and therefore an engine side) to each boot as well as an "up" orientation.

If you look closely, there are (slightly) raised/lowered areas on both sides of the boots. These correspond lowered/raised areas on the carburetors and cylinder heads. In the photo above you can clearly see the "UP" with an arrow to the right of the wording, as well as "CARB SIDE".
I also chose to orient the boot clamps so that they face the left side of the bike. This provides much better access as you do not have to battle with coolant hoses. You may also want to switch from the original equipment Phillips head screws to stainless steel Allen head cap screws. The advantage here is twofold; stainless steel will not corrode as easily and you can use a ball end Allen wrench to facilitate the tightening/loosening of the fasteners.

Here, the clamps have been reoriented but I have not yet switched to the Allen head cap screws (and have since done so).
Pro Tip: Use silicone to lubricate the boots before installing them on the carburetors and cylinder heads. The silicone will help them slide onto the metal but will also help them to seal. Do not use wheel bearing grease (as someone did to my boots). Petroleum grease will cause the boots to soften and deteriorate.
Start by removing the bodywork so that you can access the fuel tank. Here's a LINK to Chapter 12 of the Shop Manual, which outlines the bodywork removal. You will need to remove the Side Covers and the Side Fairings only.
When that step is complete, you'll need to follow procedures in Chapter 4 of the Shop Manual (LINK). Start on page 4-3.
Images are thumbnails, click for larger version.
Here, I have removed the bodywork and the fuel tank:

Disconnect the fuel overflow tube from the side of the air box. There are six Phillips head screws holding the air box cover. Remove them, remove the cover and the air filter. You may have to wiggle the cover, from side-to-side, as the snorkel is tucked into the frame near the head bearings.

There is a domed screen over the carburetor trumpets. Around the perimeter of that screen are four Phillips head screws. Remove them so that the bottom of the air box can be removed. Also, be sure to remove the breather tube from the right rear corner of the air box base.
It's now time to remove the carburetors (along with the cast aluminum plenum), as an assembly. To do so, loosen the four carburetor boot retaining clamps. The Shop Manual shows the clamps to be oriented so that access is from the right side of the bike. This means you'll have to peer through coolant hoses to locate the screw heads.
With the clamps loose, grasp the aluminum plenum and wiggle it backward/forward and side-to-side to break the carburetor assembly loose from the boots and/or cylinder heads. If the boots have hardened, you may need to cut them, from top to bottom, with a razor blade (utility knife). Try to be patient here, sometimes counter-intuitive movements will achieve the desired results.

Now that the carburetor assembly is free of the boots/motor, you will need to disconnect the choke cables as well as remove the accelerator cables.
For the choke cables, use a 14mm open end wrench to loosen the choke valve nut. Take care here as the nuts are plastic and can easily strip. Once they are loose, you can remove them using your fingers. There is a rubber boot that covers a portion of the nut and part of the cable. The boot will be tight (no air leaks!) and thus cause the nut to turn slowly. Be patient, turn the nut and wait for the boot to "catch up", then turn the nut some more. When the rear choke cable is free, drape it over the right side of the frame, this will help keep it out of your way while you work on the valve nut on the front carburetor.

For the throttle cables, use a 10mm wrench to loosen the lock nuts. The lock nuts are the nuts closest to the throttle drum (where the cable ends attach). You may need to use another 10mm wrench to keep the adjuster nuts from turning. Spin the lock nuts all the way to the end of the exposed threads (but not off). You should now have plenty of room to free the cables from the cable holder. Rotate the throttle drum, clockwise, which will expose the lower cable end. Remove the lower cable end from the drum. Release the drum and remove the upper cable end from the drum. The carburetor assembly should now be free and can be set aside (for whatever maintenance is required).

You may want to use a small piece of rag or paper towel to block the intake ports. You certainly do not want any dirt/debris (or parts!) to fall into that opening. If one, or both, of the boots remain on the cylinder head(s), remove it/them. Take this opportunity to clean around the cylinder head openings (and the upper engine in general). If you're changing spark plugs, you now have excellent access to the rear cylinder head.
I chose to attach the boots to the carburetor assembly and then put the entire assembly back on the motor (after I finished working on the carburetors). I did it in this manner because I wanted to ensure that I had the boot oriented correctly. There is a "carb side" (and therefore an engine side) to each boot as well as an "up" orientation.

If you look closely, there are (slightly) raised/lowered areas on both sides of the boots. These correspond lowered/raised areas on the carburetors and cylinder heads. In the photo above you can clearly see the "UP" with an arrow to the right of the wording, as well as "CARB SIDE".
I also chose to orient the boot clamps so that they face the left side of the bike. This provides much better access as you do not have to battle with coolant hoses. You may also want to switch from the original equipment Phillips head screws to stainless steel Allen head cap screws. The advantage here is twofold; stainless steel will not corrode as easily and you can use a ball end Allen wrench to facilitate the tightening/loosening of the fasteners.

Here, the clamps have been reoriented but I have not yet switched to the Allen head cap screws (and have since done so).
Pro Tip: Use silicone to lubricate the boots before installing them on the carburetors and cylinder heads. The silicone will help them slide onto the metal but will also help them to seal. Do not use wheel bearing grease (as someone did to my boots). Petroleum grease will cause the boots to soften and deteriorate.
Subscribe to:
Posts (Atom)