Start by removing the bodywork so that you can access the fuel tank. Here's a LINK to Chapter 12 of the Shop Manual, which outlines the bodywork removal. You will need to remove the Side Covers and the Side Fairings only.
When that step is complete, you'll need to follow procedures in Chapter 4 of the Shop Manual (LINK). Start on page 4-3.
Images are thumbnails, click for larger version.
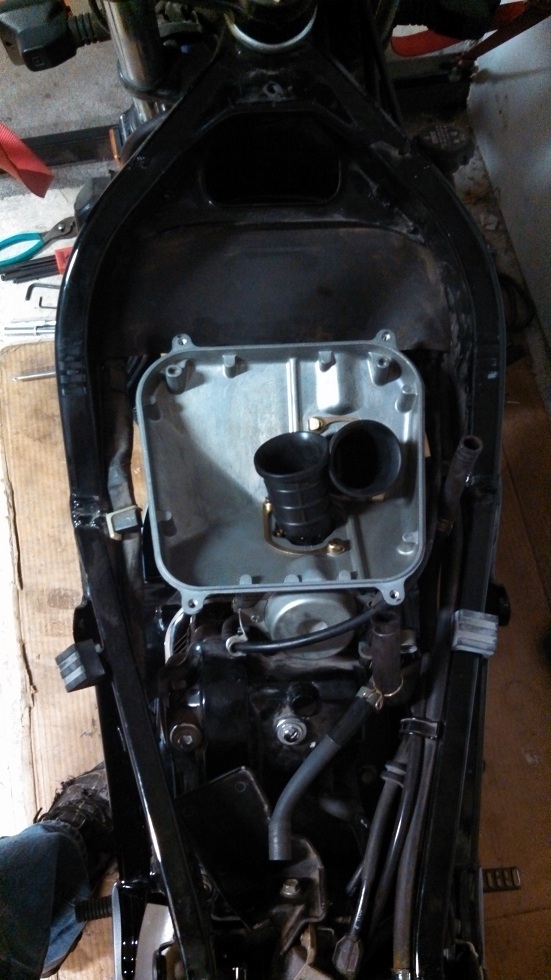
Here, I have removed the bodywork and the fuel tank:

Disconnect the fuel overflow tube from the side of the air box. There are six Phillips head screws holding the air box cover. Remove them, remove the cover and the air filter. You may have to wiggle the cover, from side-to-side, as the snorkel is tucked into the frame near the head bearings.

There is a domed screen over the carburetor trumpets. Around the perimeter of that screen are four Phillips head screws. Remove them so that the bottom of the air box can be removed. Also, be sure to remove the breather tube from the right rear corner of the air box base.
It's now time to remove the carburetors (along with the cast aluminum plenum), as an assembly. To do so, loosen the four carburetor boot retaining clamps. The Shop Manual shows the clamps to be oriented so that access is from the right side of the bike. This means you'll have to peer through coolant hoses to locate the screw heads.
With the clamps loose, grasp the aluminum plenum and wiggle it backward/forward and side-to-side to break the carburetor assembly loose from the boots and/or cylinder heads. If the boots have hardened, you may need to cut them, from top to bottom, with a razor blade (utility knife). Try to be patient here, sometimes counter-intuitive movements will achieve the desired results.

Now that the carburetor assembly is free of the boots/motor, you will need to disconnect the choke cables as well as remove the accelerator cables.
For the choke cables, use a 14mm open end wrench to loosen the choke valve nut. Take care here as the nuts are plastic and can easily strip. Once they are loose, you can remove them using your fingers. There is a rubber boot that covers a portion of the nut and part of the cable. The boot will be tight (no air leaks!) and thus cause the nut to turn slowly. Be patient, turn the nut and wait for the boot to "catch up", then turn the nut some more. When the rear choke cable is free, drape it over the right side of the frame, this will help keep it out of your way while you work on the valve nut on the front carburetor.

For the throttle cables, use a 10mm wrench to loosen the lock nuts. The lock nuts are the nuts closest to the throttle drum (where the cable ends attach). You may need to use another 10mm wrench to keep the adjuster nuts from turning. Spin the lock nuts all the way to the end of the exposed threads (but not off). You should now have plenty of room to free the cables from the cable holder. Rotate the throttle drum, clockwise, which will expose the lower cable end. Remove the lower cable end from the drum. Release the drum and remove the upper cable end from the drum. The carburetor assembly should now be free and can be set aside (for whatever maintenance is required).

You may want to use a small piece of rag or paper towel to block the intake ports. You certainly do not want any dirt/debris (or parts!) to fall into that opening. If one, or both, of the boots remain on the cylinder head(s), remove it/them. Take this opportunity to clean around the cylinder head openings (and the upper engine in general). If you're changing spark plugs, you now have excellent access to the rear cylinder head.
I chose to attach the boots to the carburetor assembly and then put the entire assembly back on the motor (after I finished working on the carburetors). I did it in this manner because I wanted to ensure that I had the boot oriented correctly. There is a "carb side" (and therefore an engine side) to each boot as well as an "up" orientation.

If you look closely, there are (slightly) raised/lowered areas on both sides of the boots. These correspond lowered/raised areas on the carburetors and cylinder heads. In the photo above you can clearly see the "UP" with an arrow to the right of the wording, as well as "CARB SIDE".
I also chose to orient the boot clamps so that they face the left side of the bike. This provides much better access as you do not have to battle with coolant hoses. You may also want to switch from the original equipment Phillips head screws to stainless steel Allen head cap screws. The advantage here is twofold; stainless steel will not corrode as easily and you can use a ball end Allen wrench to facilitate the tightening/loosening of the fasteners.

Here, the clamps have been reoriented but I have not yet switched to the Allen head cap screws (and have since done so).
Pro Tip: Use silicone to lubricate the boots before installing them on the carburetors and cylinder heads. The silicone will help them slide onto the metal but will also help them to seal. Do not use wheel bearing grease (as someone did to my boots). Petroleum grease will cause the boots to soften and deteriorate.
No comments:
Post a Comment